Then select the shrinksharp2.lrplugin directory. The Plugin will be added then.
ShrinkSharp2 is a export plugin for Adobe Lightroom.
The main purpose of this plugin is to resize and sharpen pictures in a way to get the maximum possible quality for showing them later an a screen.
Most cameras nowadays have a much greater resolution then the screens the pictures are shown on later. The apps which are used to display the pictures have to scale them down to fit the screen. This is mostly done in a very fast way and the results are not as good as they could be. I've seen an article from Phillip Reeve in a German forum which describes a cascaded shrinking and sharpening process to the final screen resolution with a Photoshop action.
To simplify this process I have written this plugin.
Besides this main feature the plugin is also able to frame the picture and
annotate it with text and EXIF data
from the LR catalog. It's also able to put the output pictures
into a directory structure equal to
the structure of the original RAW's.
It's a replacement of the old ShrinkSharp plugin written in Perl which I do not
longer support.
This plugin is only a wrapper for ImageMagick and ExifTool. These great tools are doing the real work here.
This plugin is in development state at the moment. I'm NOT a programmer. I'm a system administrator. So my programming skills are limited. Please use with care.
At the moment there are several shortcomings.
You can see examples here.
To configure the plugin go to the export dialog.
Here you can see the plugin now in the Nachbearbeitungsoptionen section. You have to select the "ShrinkSharp Configuration" (1) and hit Insert (2).
It is necessary to set some basic configurations to make this plugin work correctly:
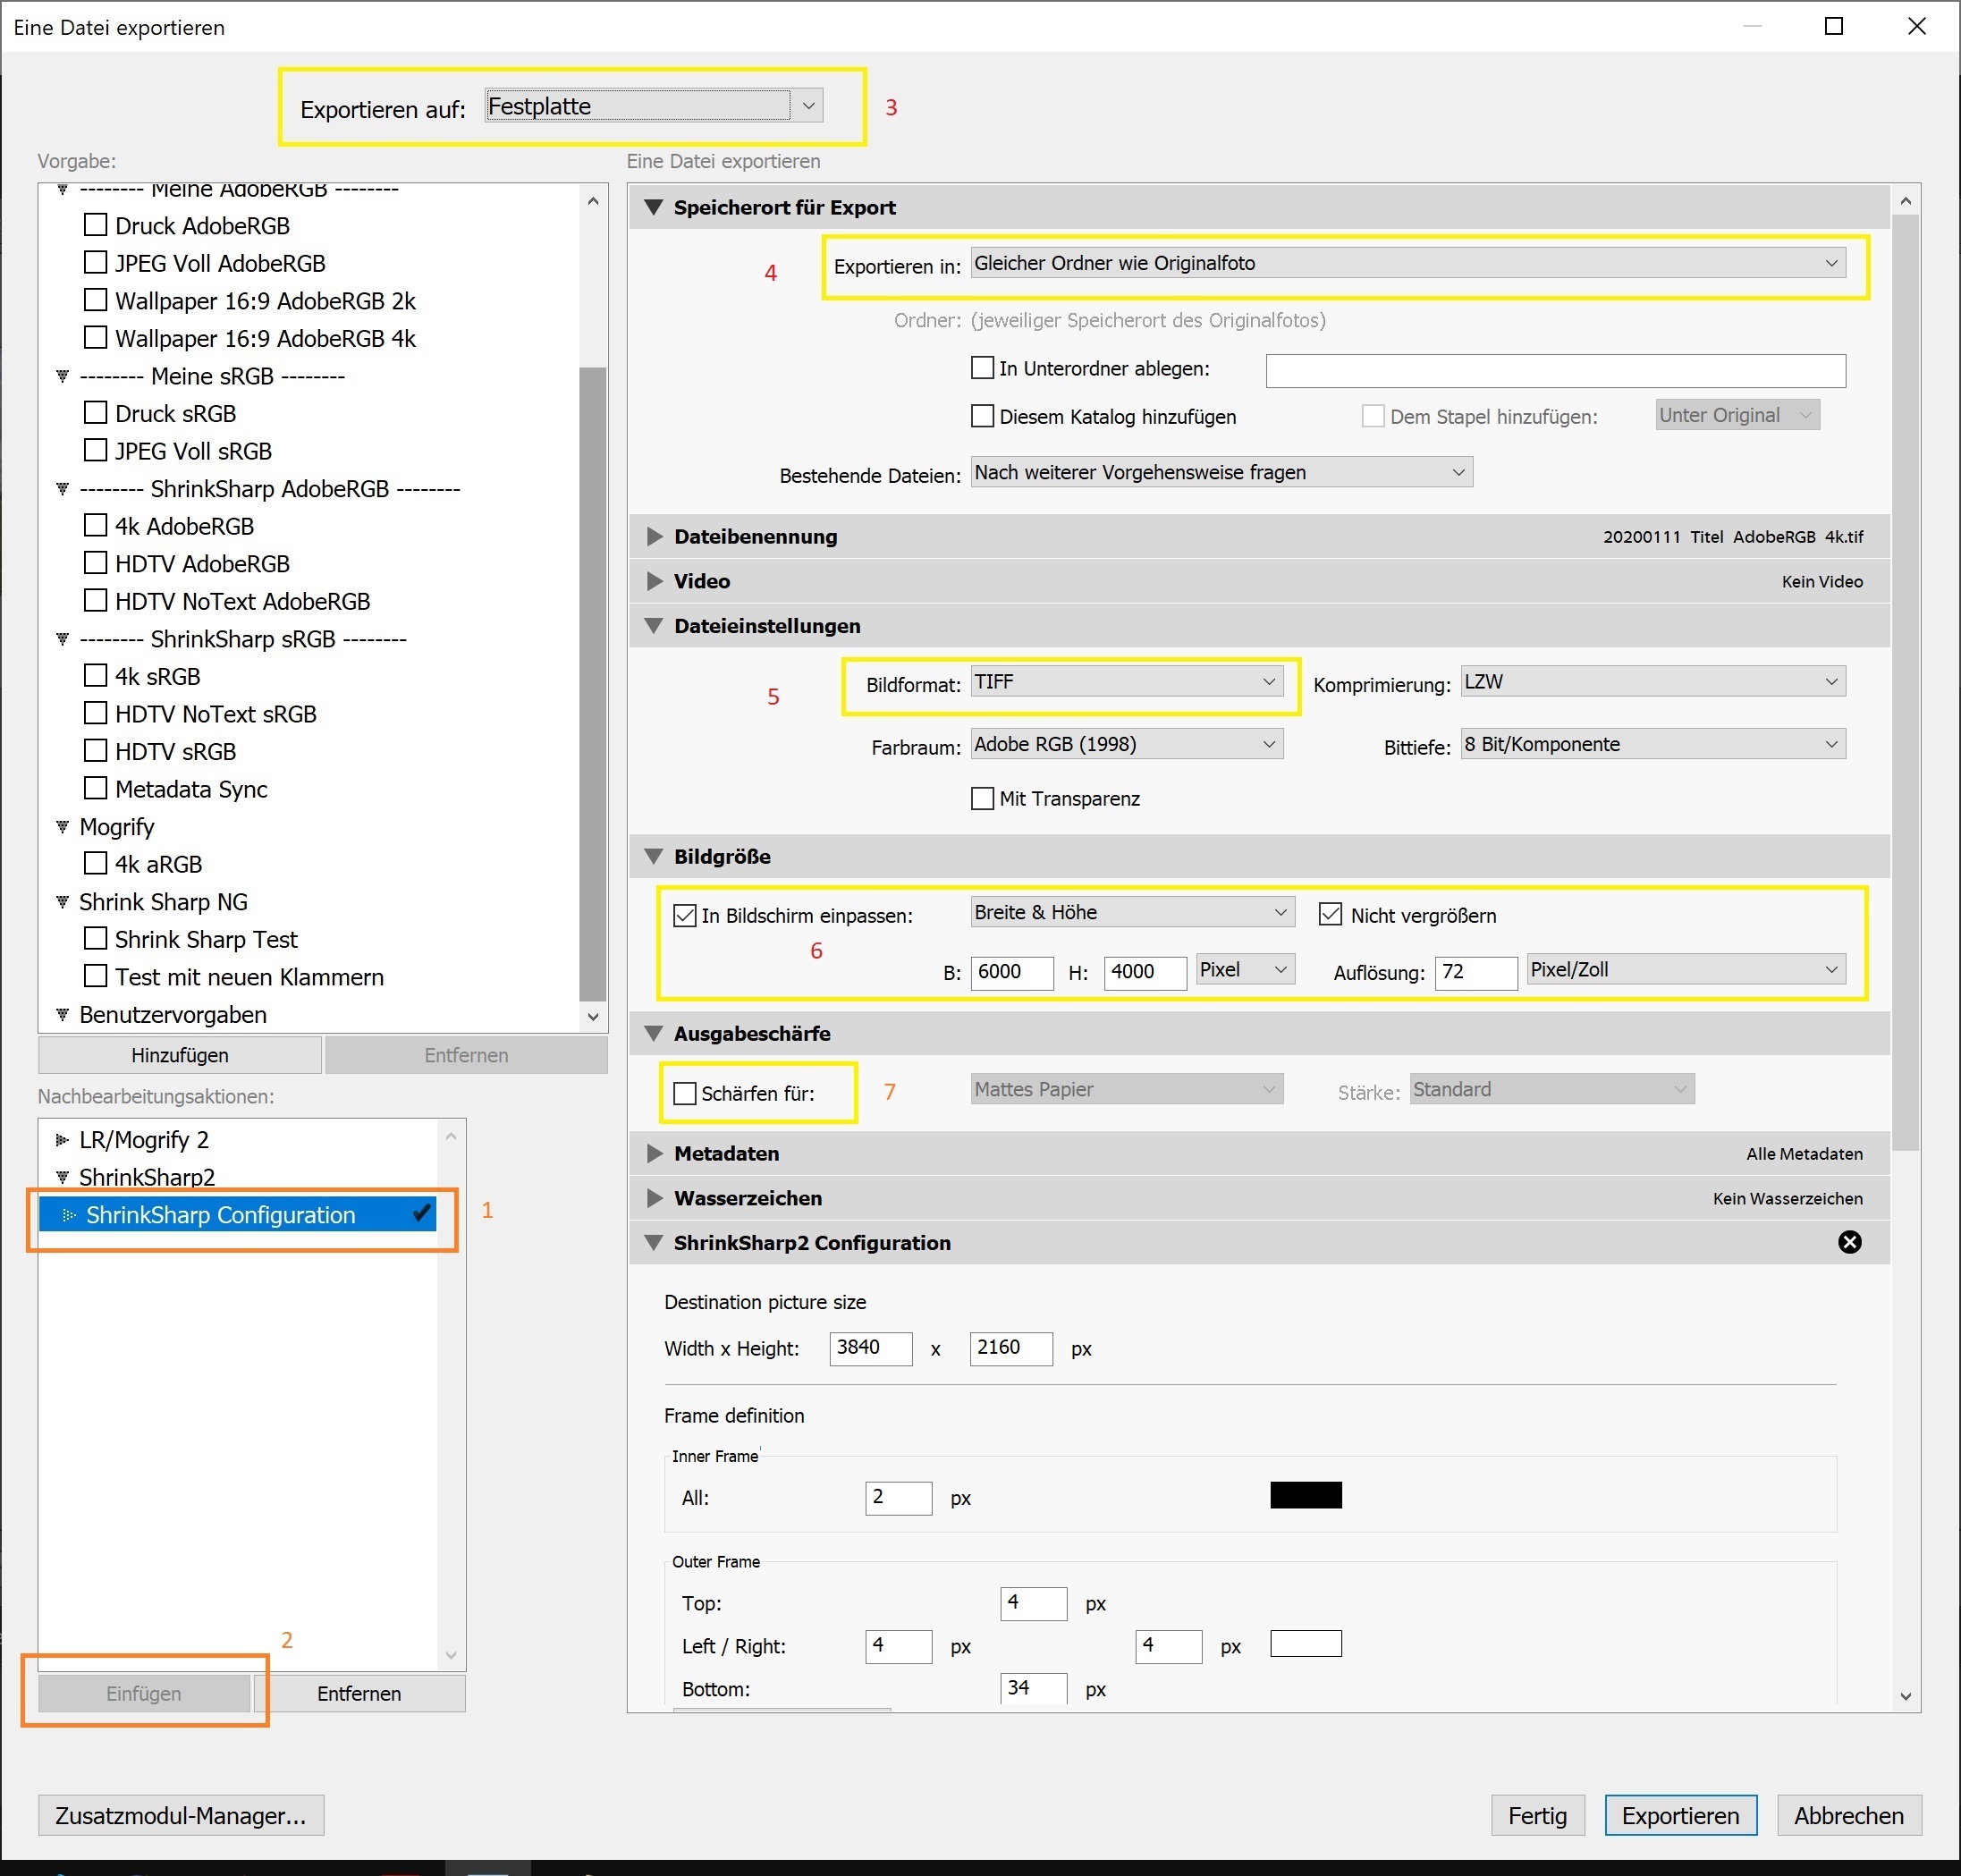
The values are pretty self explaining.
|
Value |
Description |
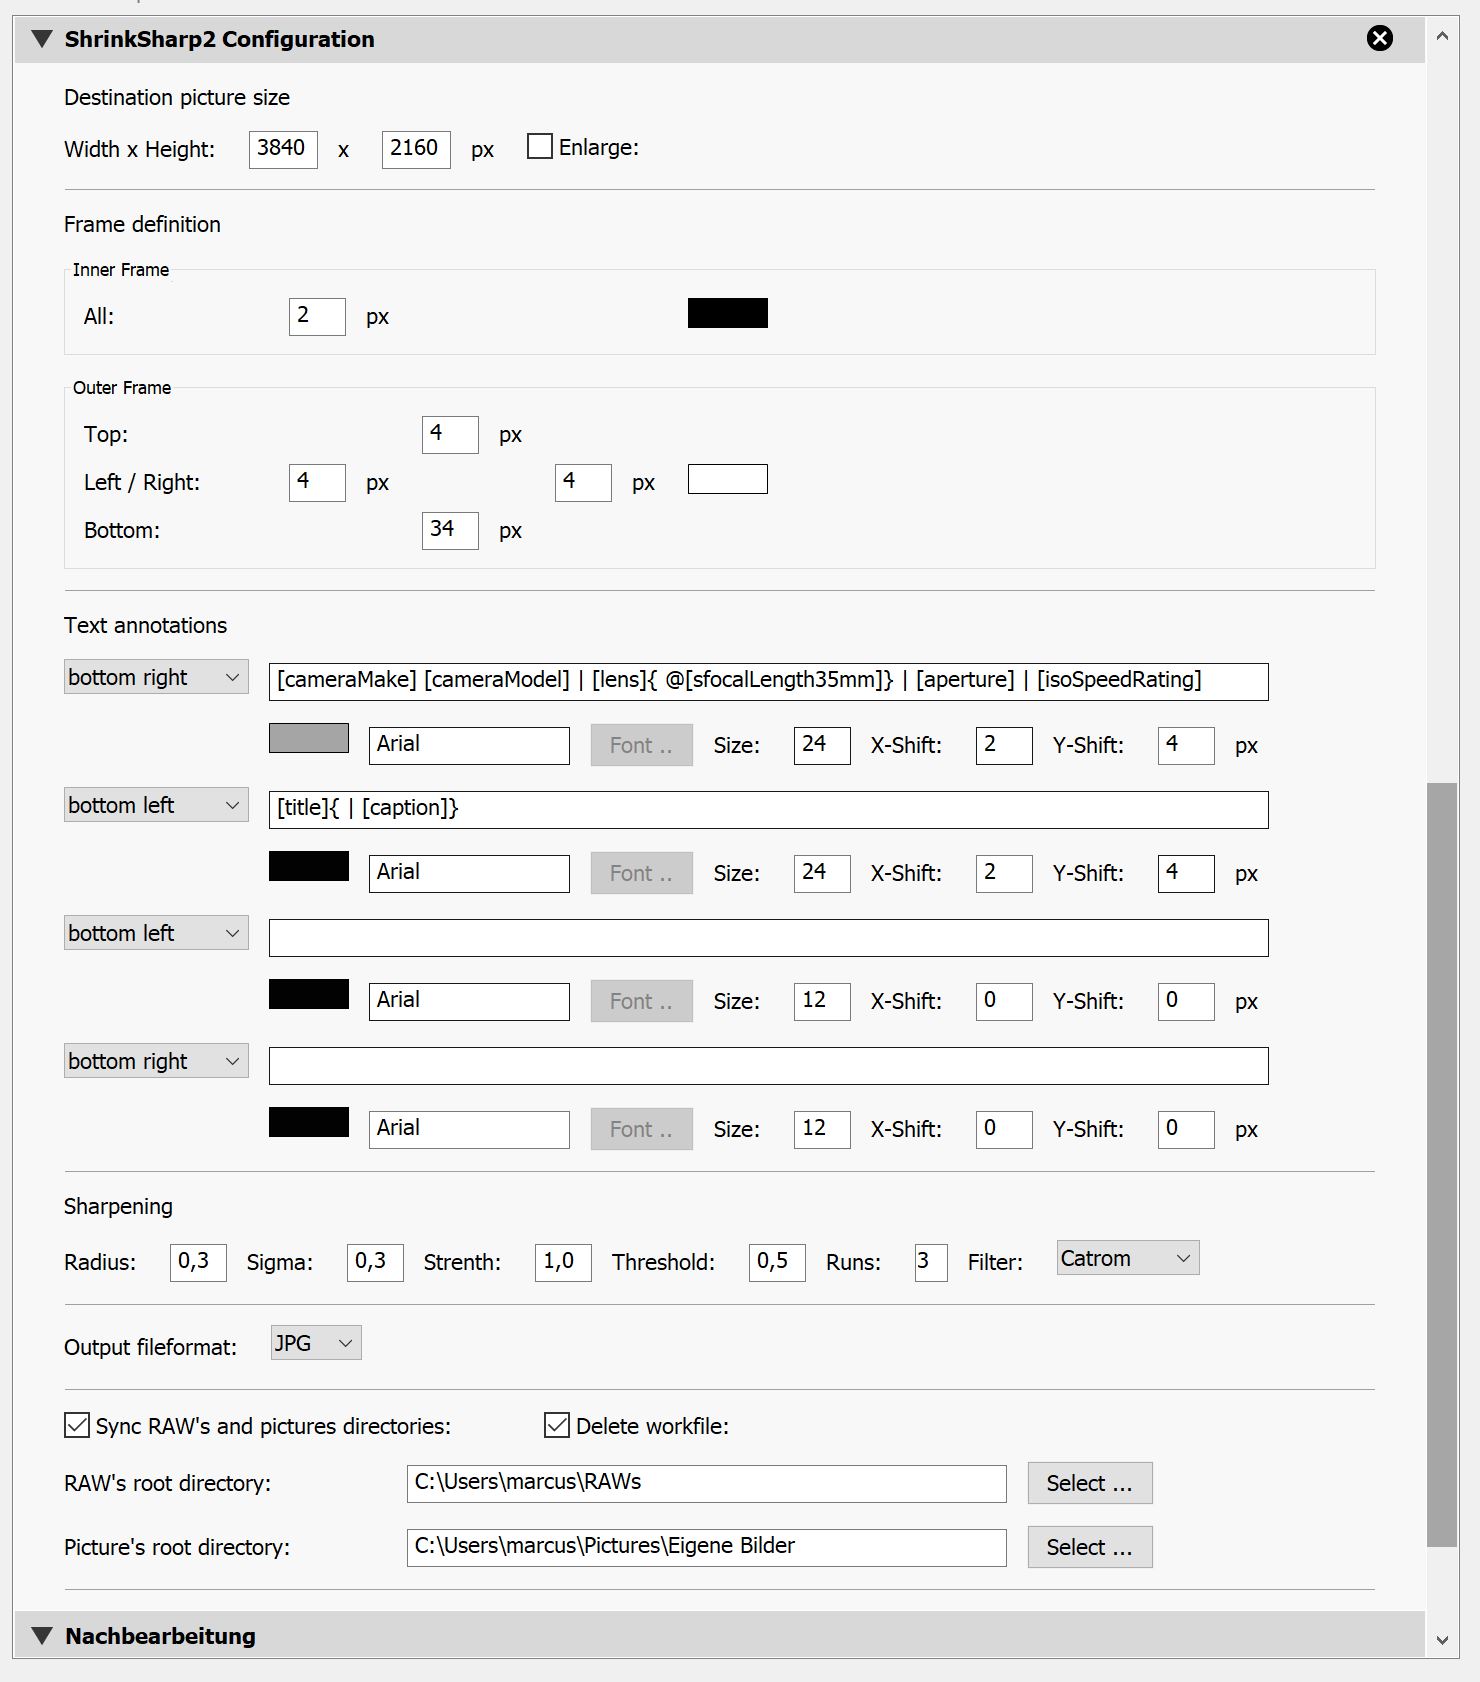
| Destination picture
size: Width |
Width of the rendered
picture including the frame. |
| Destination picture size: Height | Height
of the rendered picture including the frame. |
| Enlarge | Choose if the final picture will be enlarged if the original is smaller then the destination. I don't recommend this because the quality will drop. |
| Inner frame |
Thickness of the
inner frame and it's colour. Set this to 0 to get no inner frame |
| Outer frame (top,
left, right, botom) |
Thickness of the
outer frame parts and it's colour. Set this to 0 to get no outer frame
parts |
| Text annotations |
Declaration of the
text annotations, there colour, font and location on the final picture. There is no font selector yet for Windows but you can list your system fonts in Windows with \PluginPATH\win\imagemagick\magick.exe convert -list font but only fonts of the type ttf my be used. Under MacOS you can select a TTF fontsfile direct with a selector. With the X- and Y-Shift it is possible to move them to fit better your needs because the location setting will put the text straight to the edges of the picture. You can use whatever text you want and combine it with EXIF tags. These tags have thy syntax [TAG_NAME] For example: [cameraMake] [cameraModel] | [lens] {@[sfocalLength35mm]} | [aperture] | [isoSpeedRating] and [title]{ | [caption]} As you can see the caption tag in the second line and it's separator in encapsulated in {}-braces. This has the effect that all chars within the {}-braces are deleted if the tag is empty. You get "Title" and not "Title | " if the caption value is empty. This can be used for every tag. You may only one tag in {}-braces |
| Sharpening |
With sigma,radius,
strength and threshold the amount of sharpening can be set. Good values depends on your needs. I found values of 0,4 - 1,0 - 0,5 - 0,15 useful. That may vary from your needs, taste and picture type. A very good explanation of those Values can be found here https://redskiesatnight.com/2005/04/06/sharpening-using-image-magick/ |
| Runs | How many runs with shrinking and sharpening will be used to get the final size |
| Filter | Which filter akgorythm is used for resizing. Pleas look to the ImageMagick filter pages for more infos. |
| Output format |
In which format the
final picture will be rendered. |
| Sync RAW directory
structure |
With this feature
enabled the final picture will be created in a directory hierarchy equal
to the RAWs. If you want to use this pleas select "Gleicher Ordner wie Originalfoto" in the "Speicherort für Export" tab. In the both directory fields you have to set the root directories iv which the equal hierarchy is starting for source and destination. Needed subdirectories will be created automatically. Please be aware that destination files will be overwritten by default. |
| Delete workfile |
Should the working
file be deleted after work is done? |
| Tag Name | Description |
| fileName | The leaf name of the file (for example, "myFile.jpg") |
| folderName | The name of the folder the file is in |
| rating | The user rating of the file (either nil or number of stars) |
| title | The title of photo |
| caption | The caption for photo |
| exposure | The exposure summary (for example, "1/60 sec at f/2.8") |
| lens | The lens (for example, "28.0-135.0 mm") |
| shutterSpeed | The shutter speed (for example, "1/60 sec") |
| aperture | The aperture (for example, "f/2.8") |
| isoSpeedRating | The ISO speed rating (for example, "ISO 200") |
| focalLength | The focal length of lens as shot (for example, "132 mm") |
| focalLength35mm | The focal length as 35mm equivalent (for example, "211 mm") |
| sfocalLength |
The focal length of lens as shot (for example, "132 mm") This parameter is not original from LR, it's my own one. It is filled with the focalLength value in case that a zoom lens is used. This is recognized by [-][numbers(s)]mm in the lens string. If it is not a zoom lens the value is empty. You can use the {} mechanism to leave the focal length complete empty if no zoom is used. This is useful because in the focal length is part of the lens name already. |
| sfocalLength35mm |
The focal length as 35mm equivalent (for example, "211 mm") This parameter is not original from LR, it's my own one. It is filled with the focalLength35mm value in case that a zoom lens is used. This is recognized by [-][numbers(s)]mm in the lens string. If it is not a zoom lens the value is empty. You can use the {} mechanism to leave the focal length complete empty if no zoom is used. This is useful because in the focal length is part of the lens name already. |
| dateTimeOriginal | The date and time of capture (for example, "09/15/2005 17:32:50") Formatting can vary based on the user's localization settings |
| dateTime | Adjusted date and time (for example, "09/15/2005 17:32:50") Formatting can vary based on the user's localization settings |
| cameraMake | The camera manufacturer |
| cameraModel | The camera model |
| artist | The artist's name |
| gps | gps: (string) The location of this photo (for example, "37°56'10" N 27°20'42" E") |
There are mny more. Please ave a look to the SDK pages.
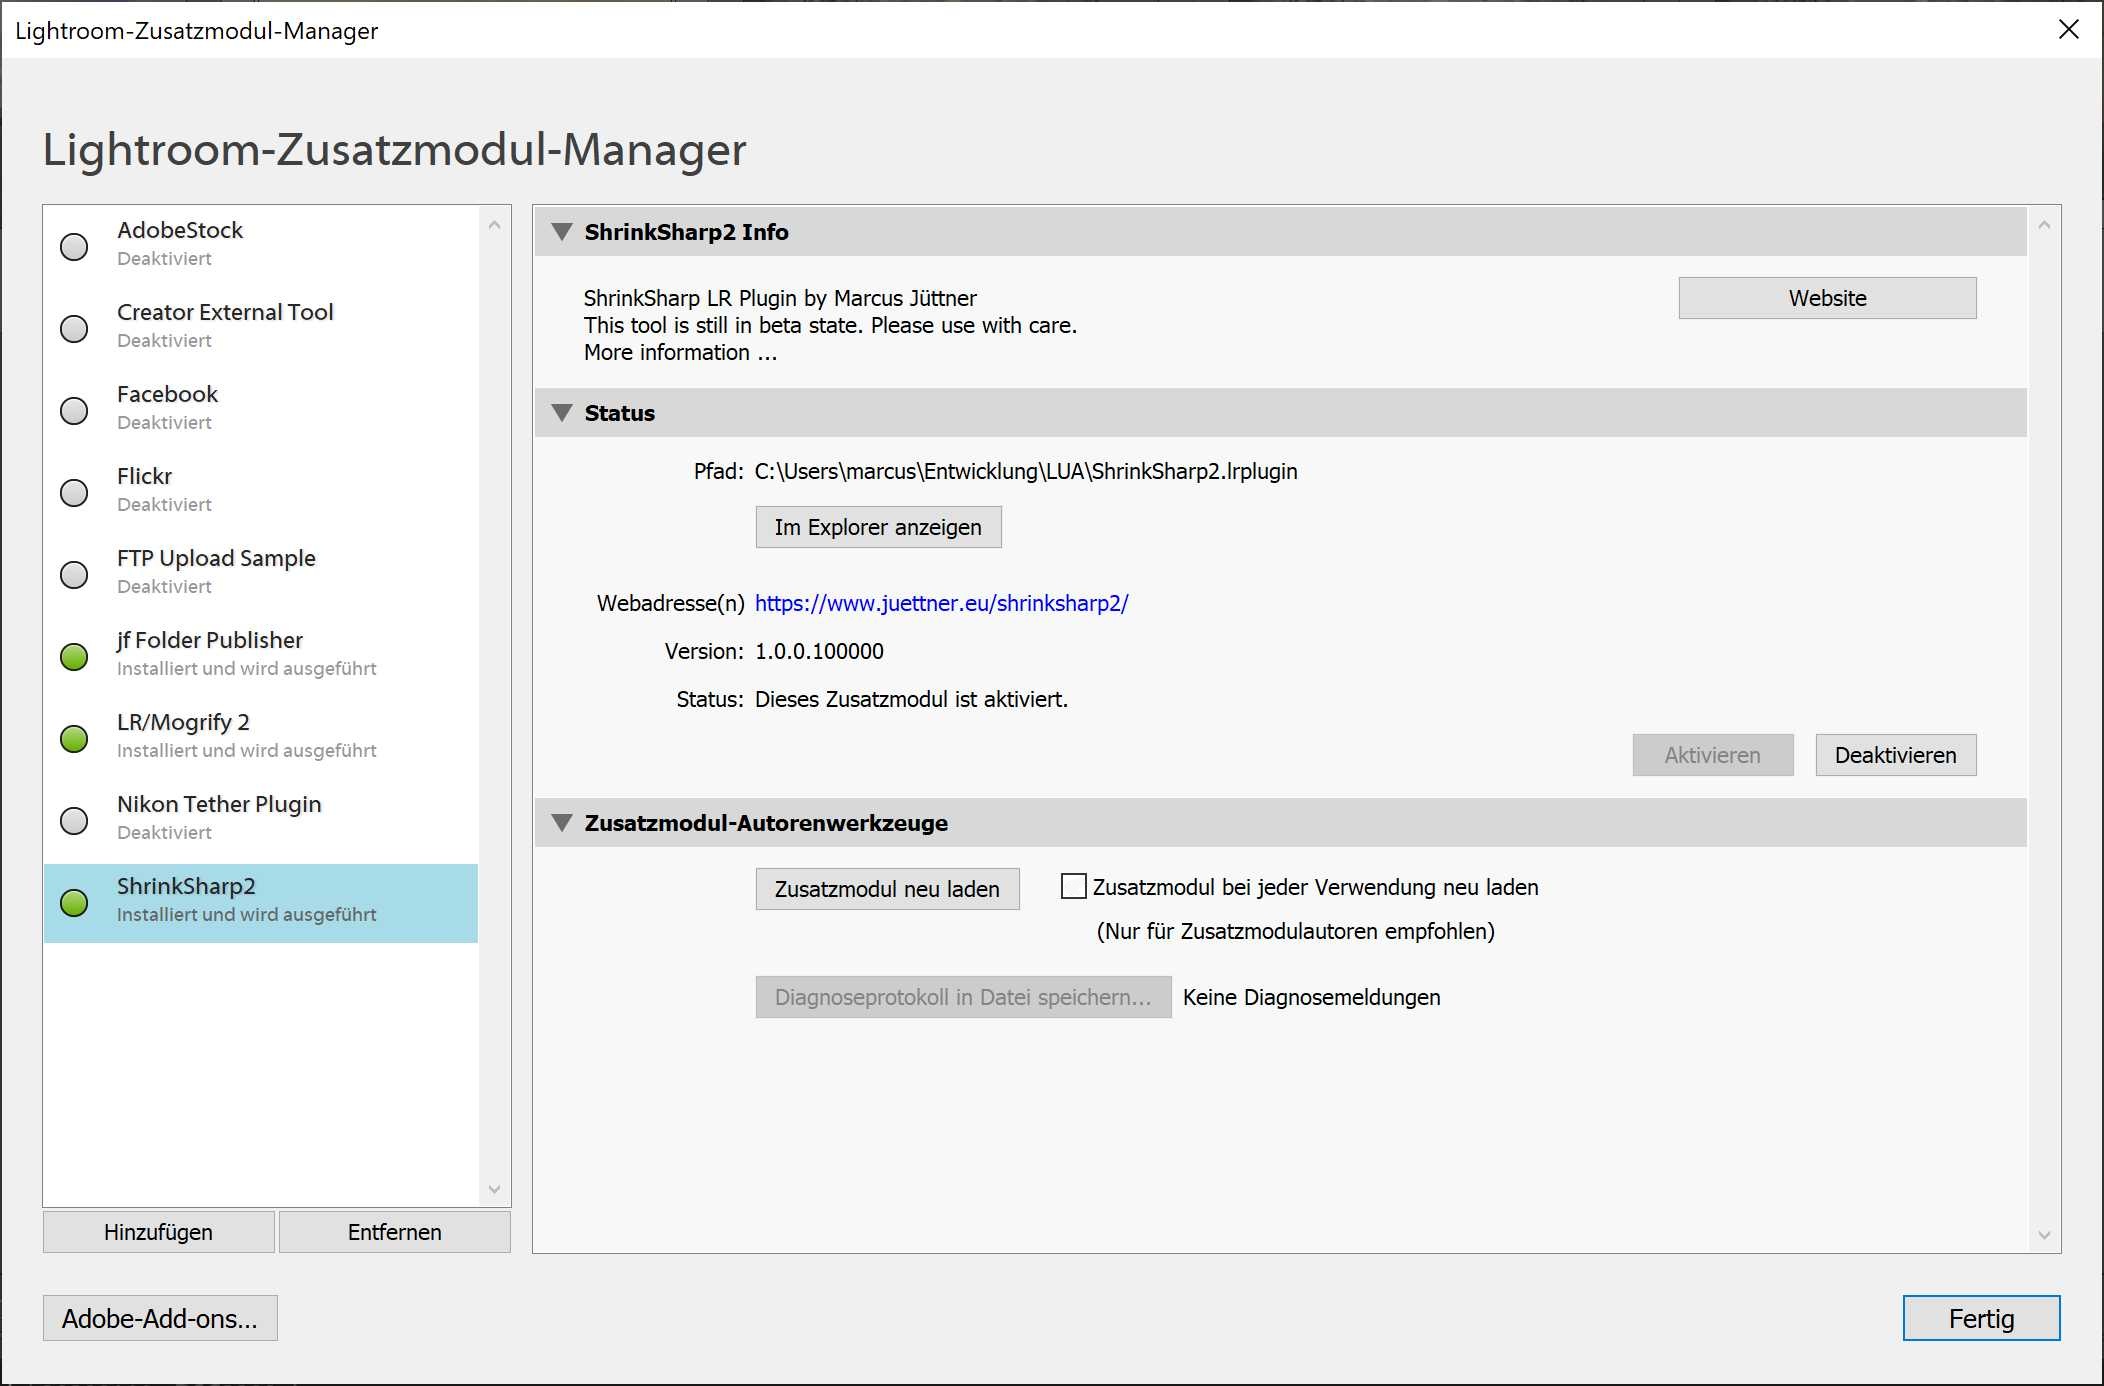
There my be problems and errors while using this plugin. Espacialy now because of the beta state. To help me solving the bugs you can send me so much information as possible.
If the render process is interuppted due an error please go to the PluginManager. You may see the error there. Please send me this error.
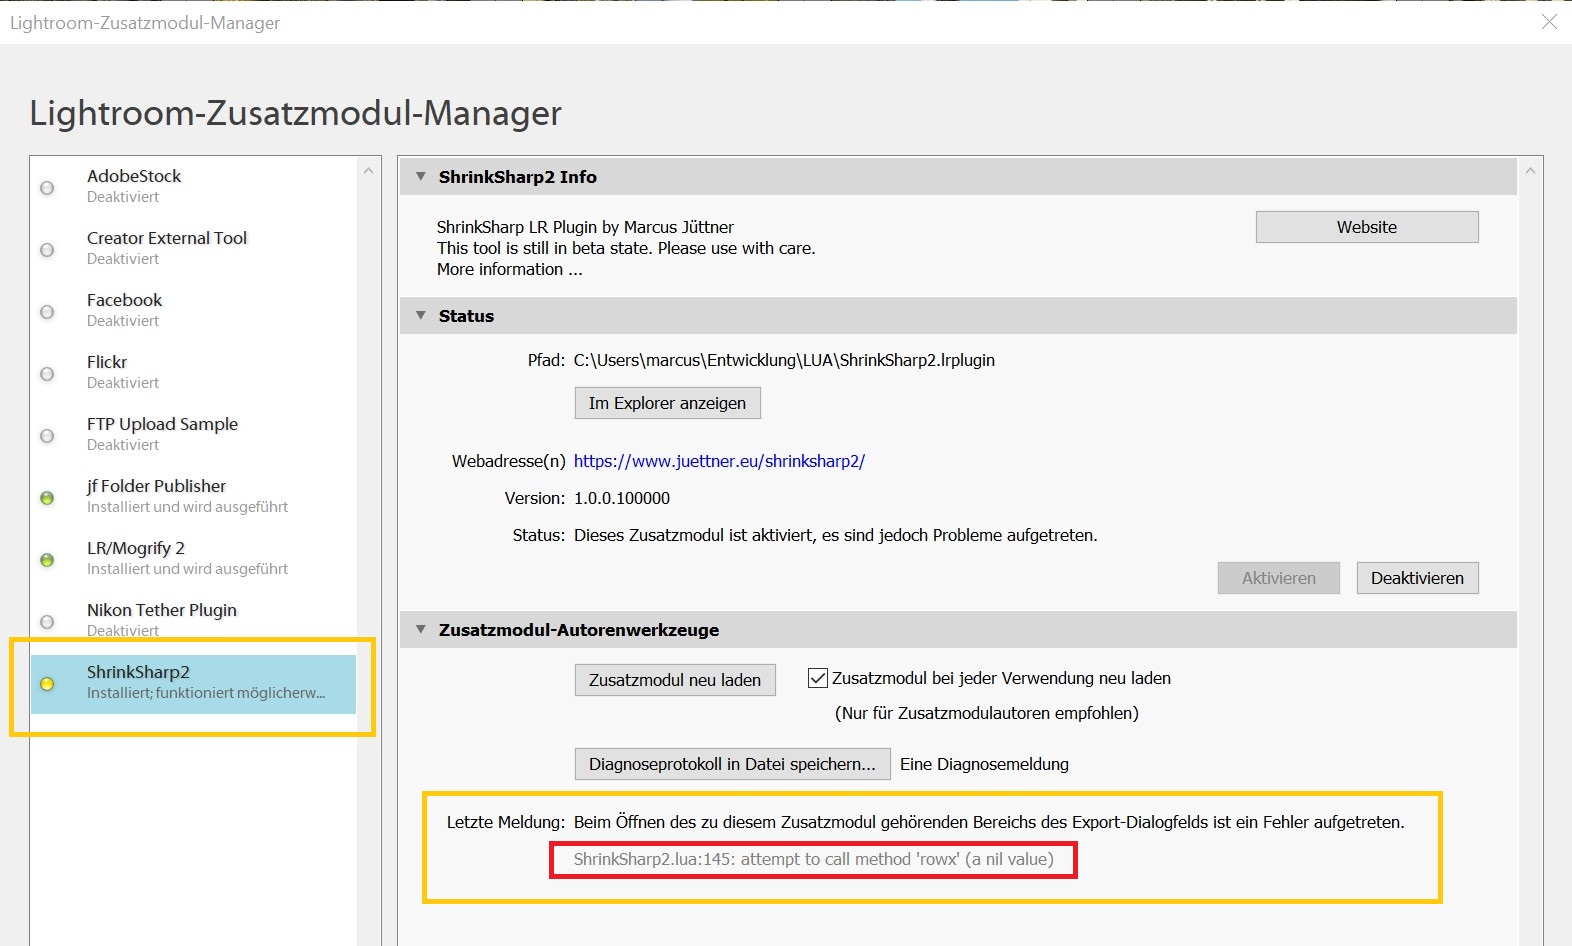
At the moment the plugin is writing a logfile. You can find this file:
Windows:
c:\Users\YOUR_USER\Documents\LrClassicLogs\
Mac
OS:
ImageMagick itself is writing a logfile
Windows:
c:\Users\YOUR_USER\AppData\Local\Temp\shrinksharp2.log
Mac OS:
/tmp/shrinksharp2.log
Please report errors to this forum thread. Link to support forum
| Date | Version Number | Changes |
| 06.03.2020 | 0.1 | 1. Beta Release |
| 10.03.2020 | 0.2 | Added GUI field
for number of resize/sharpening runs. Added GUI field for choosing resize filter algorithm. Fix eror in calculating the intermediate resize steps. |
| 11.03.2020 | 0.3 | Added the
capability to allow or deny the enlargement if original size is smaller then the
destination size. Fixed number/string errors |
| 12.03.2020 | 0.4 | Added the capability to leave the focal length empty in annotations if a zoom lens is used. |
| 18.03.2020 | 0.5 | MacOS
support. Added strength and threshold to sharpening values. Fixed eror in calculating the intermediate resize steps. Fixed error not using text colors as configured. |
| 04.05.2020 | 0.6 | Fix for Zoner
does not show time of creation. Plugin can use installed or included ImageMagick (Windows only). Fixed bug in size calculations. |